
The IE functions in most factories is primarily limited to work measurement which constitutes Method Study and Time Study of the same method, but with limited application in practice whereas work measurement is one important activity and should be done with utmost care and accuracy. Deviation from the standard method may lead to spending excess time to do the same activity which leads to process imbalance that makes the product costlier and result into reduced profitability to the organization. Besides its function as a tool for productivity improvement, work measurement also works as a base for costing, production planning and scheduling the process. Work measurement is the application of techniques designed to establish the time for a qualified worker to carry out a task at a defined rate of working. It involves first, finding out different elements of the production process, second finding out the time taken by each element, and third fix the standard time for performing the production process. Here, we will limit our discussion to Time Study only and will discuss the other work measurement techniques later. In common practice all three steps together is termed as ‘Time Study’ and will be discussed in the same manner. In this article Dr. Prabir Jana, Professor, NIFT Delhi and Manoj Tiwari, Associate Professor, NIFT Jodhpur discuss the practical applications and implications of work measurement, limited to Time Study only.
Work Measurement is used to develop standard times needed to perform operations. It works as a base for costing, production planning and scheduling the process. Sticking to the standard time is also an indicator of organization health which results into on-time delivery of goods. Other applications of work measurement data may be in capacity calculation, capacity planning and booking, process balancing, simulation while planning, operator’s evaluation and comparison, skill development, and many such complementary processes.
Many a times it’s observed that values obtained from Time Study don’t reflect in the practice and a significant deviation is witnessed from the time values set and actually achieved. Selection of the task for Time Study must be evaluated on measurable criteria like, work should be clearly measurable and performed in a consistent manner, which means there should be uniformity in the work being done. Considering the start-up losses and learning curve, it is also recommended that there should be a considerable volume of work. In practical situations, it has been observed that in case of smaller volumes, style gets over by the time production reaches to its peak or even before. In such situations time values measured may not be that much result-oriented and practically applicable.
While conducting Time Study by stopwatch and board, the position of Time Study engineer is also important, while the engineer should have a clear view of the hand movement, he/she should not create inconveniences to the normal working of the operator. Nowadays most of the organized factories carry out Time Study through videography of the operation, it is important to calibrate the replay speed with the actual speed of the operation.
Time Study is a cumbersome task. It involves time, money and of course manpower. To make Time Study exercise accurate and fruitful it should be conducted in a logical manner. It starts with careful selection of work to be studied followed by investigating the circumstances (method, machine, workplace, etc.), careful elemental breakdown and its sequential arrangement and finally getting the standard time values. An eight-step easy approach recommended for Time Study is shown in Figure 1.
|
Figure 1. Stteps in Time Study |
|
Step 1 |
Obtain and record all the information available about the job, the operator and the surrounding conditions, which is likely to affect the carrying out of the work (working conditions). |
|
Step 2 |
Record a complete description of the method, breakdown the operation into “elements” |
|
Step 3 |
Examine the detailed breakdown to ensure that the most effective method and motions are being used, and determining the sample size. |
|
Step 4 |
Measure with a timing device (usually a stop-watch) and recording the time taken by the operator to perform each “element” of the operation. |
|
Step 5 |
Assess the effective speed of working of the operator relative to the standard rating. |
|
Step 6 |
Extend the observed times to “basic times” |
|
Step 7 |
Determine the allowances to be made over and above the basic time for the operation |
|
Step 8 |
Determine the “standard time” for the operation. |
Getting the information about work – This is the first step of Time Study. The observer should collect the information related to kind of work, machine and equipment going to be used, material used, work place arrangement as well as the details of surrounding.
Breaking down operation into elements – Once the operation to be measured is selected, the same needs to be broken down into elements. Elemental breakdown provides an opportunity of detailed investigation and enables finding out the time consumed in value-added and non-value added activities. The accuracy of Time Study depends on the elemental breakdown. The key considerations suggested for elemental breakdown are:
|
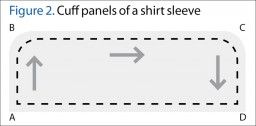
Table 1. Elemental breakdown of joining the shirt cuff panels |
|
Category |
Element No. |
Element Description |
Remarks |
|
PICK |
1 |
Picking up one panel and other by left and right hand |
Involves moving of hands to pick, grasping panels and coming back to the machine bed |
|
2 |
Putting panels face to face, alignment and placement |
Pre-positioning of panels using both hands |
|
3 |
Lifting the presser foot, sliding the aligned panels till needle point and lowering down the presser foot |
Lifting of presser foot using knee and sliding to needle point by hands |
|
STITCH |
4 |
Lowering down the needle and start stitch (from point A to B) with back tack |
Needle lowering down using machine hand wheel by right hand |
|
5 |
Stop near to point B, align and start stitching at curve. Stitch (from point B to C) |
At curve slower down speed and using both hands |
|
6 |
Stop near to point C, align and start stitching at curve. Stitch (from point C to D) and finish stitch at point D with back tack |
At curve slower down speed and using both hands |
|
DISPOSE |
7 |
Lifting the presser foot and taking out stitched panels and lowering down the presser foot |
Lifting of presser foot using knee and taking out stitched panels by left hand |
|
8 |
Picking up trimmers and cut the thread |
Picking up trimmers and cut the thread by left hand while holding the panels by right hand |
|
9 |
Moving back the trimmers by one hand and disposing of the stitched panels |
Disposing of the stitched panels by left hand |
1. Each element should have a definite start and finish point and should be free from any overlap, ensuring their subsequent repeated recognition. These beginnings and ends can often be recognized by a sound or by a change of direction of the hand or arm. They are known as Break Points. A Break Point can be defined as an instance when one element in a work cycle ends and another begins except in situations where overlapping elements are involved.”
One common mistake in element breakdown is skipping some motions from the cycle. In a sewing operation, the pickup and dispose of generally happens from left and to the right of operator, respectively. During element breakdown often the first element is “start/pick up of the pieces from left side of the table” and last element of the operation is “dispose of the sewn piece to the right side of the sewing table”. After disposing of the sewn piece operator’s hand has to traverse from right to left side of the table to pick up the next piece and this hand movement is often missed in the complete cycle.
2. Always try to keep the elements simple and easy to understand. This will help in common understanding among Time Study practitioners of the organization.
3. It is good to keep the elements smaller but at the same time keeping it too small may lead to errors while observing. Hence there should be a good balance while deciding the elements. Very small elements which are difficult to observe should be merged with previous or subsequent element. Similarly the big elements should be divided into smaller elements for increased detailing. Elements having duration 0.07 min. (4.2 sec.) to 0.10 min. (6 sec.) can be reliably measured by a trained observer. Long manual elements should be rated about every 0.33 min. (20 sec.).
In practice, many IE divide the operations into three major sections, which are:
1. Pick (It generally includes picking the panel(s), moving to the needle point and handling till stitching starts); 2. Stitch (Stitching and handling while stitching); and 3. Dispose (taking out the panel(s) after stitching, keeping it aside and moving back to pick the next panel(s). Such approach is easy but may not be able to provide the minute details of work hence may not reveal the non-value added elements.
Let’s try to understand the elemental breakdown of joining the cuff panels of a shirt sleeve (refer Table 1 and Figure 2).
The thumb rule of element breakdown is element that should be small enough to be repetitive while long enough to be measurable. The rule also says manual element and machine element should be separate; there should not be any element which is mix of manual and machine element. This is to ensure machine allowances can be applied selectively to machine elements to get accurate results. However, although it sounds simple and straightforward but often faces real life challenges and compromising of rules may be imminent. For example, in pocket attaching on shirt front every time the operator reaches the corner of pocket, he/she will pivot the piece and then start sewing again.
Ideally sewing from one corner to another may be one element (machine element) and pivoting at corner should be separate element (as it is manual element). But in reality for a good operator measuring pivoting time separately may not be possible by Time Study engineer. Therefore, for all practical purposes pivoting is added to the preceding or succeeding sewing element. There will be marginal inaccuracy while adding the allowances.
Another problem of element breakdown while sewing round curve. Unlike a stoppage (and thus clear breakpoint) in sharp corner, in above example of cuff sewing, the breakpoint at point B and C is non-definitive type. The same operator may sew few stitches more or less while stopping at the corners resulting element time variation. Training on correct hand movements may bring down the variation, but operator to operator variation within one factory will still remain. Normally it is observed that operator will not stop exactly at the middle of the curve, they generally stop either at the beginning of the curve or at the end of the curve, thereby causing variation between cycles.
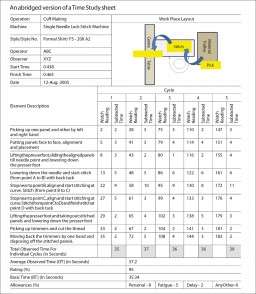
Time Study sheet
Time Study values for cuff making (for which the elemental breakdown is discussed in Table 1) are shown in Time Study sheet. The time observations were done on a continuous stop watch and values recorded are in sec. Before recording the time values, one should watchfully observe the machine, work place, operation, elemental breakdown etc. All the elements should be checked and re-checked to ensure that no activity is missed out and arrangement of elements is done in a sequential manner. Once the continuous time observations are done and recorded (in WR-Watch Reading Cells); subtracted time values for each element in each cycle should be written (in ST – Subtracted Time Cells). Observed Time (OT) is calculated by average time values of all the cycles. Further Basic Time and Standard Time is calculated using Operator Rating and different allowance.
Use of decimal stopwatch (where one minute is divided into 100 divisions) is recommended for Time Study; it is easy to visually observe the decimal watch to note down the reading in decimal of minutes and record in Time Study sheet. However, the decimal stopwatch is not easily available normal stopwatch (where one minute is divided into 60 division) is used in most factories. If normal stopwatch is used then it is advisable to record the readings in sec. and later convert to minutes. The Time Study observer should be extra cautious during calculation; a common mistake is 30 sec. is equated to 0.30 min. or 0.50 min. is equated to 50 sec. and vice versa.
The number of observations in Time Study should be statistically justified. This minimizes the error and gives realistic results. Though there are statistical formulae for sample size determination, for ease a convenient ready-to-use table (refer Table 2) is recommended. The logic is when the operation time values are smaller, chances of per cent error in observation are high compared to the instances when the operation time values are comparatively larger. Assuming, for an operation if time value is 20 sec., then due to limitations (may be human or stop watch) one may write 21sec. instead of 20 sec. or 19 sec. instead of 20 sec. Here the per cent error is 5% while recording. To minimize such errors, it is recommended to take more number of observations for small cycles. While in another case, if time value for operation is 60 sec., again the error while observing may be of 1 sec. (say 59 sec. or 61 sec. instead of 60 sec.) which is 1.67% error and lesser compared to the earlier observations of previous small cycle.
|
Table 2. Sample Size determination |
|
Cycle time in minutes |
No. of cycles to be observed |
|
To 0.10 |
200 |
|
To 0.25 |
100 |
|
To 0.50 |
60 |
|
To 0.75 |
40 |
|
To 1.0 |
30 |
|
To 2.0 |
20 |
|
To 5.0 |
15 |
|
To 10.0 |
10 |
|
To 20.0 |
8 |
|
To 40.0 |
5 |
|
Above 40.0 |
3 |
Recording of time for elements – Once the elemental breakdown of the operation is done and all the element are well defined in a sequential order, it is recommended to check the sequence of the element. Elements should be able to cover the entire operation provided performed in the sequence.
The elements need to be timed using Time Study tools such as smart Time Study board, stop watch, video camera or may be by using Smart Time and Motion Study devices. The time values observed for elements in sequence may be noted down using the Time Study formats.
|
Table 3. Elements classification |
|
Element Type |
Key characteristic |
Examples |
|
Repetitive element |
Occurs in every work cycle of an operation |
|
|
Occasional element |
Does not occur in every work cycle of an operation but may occur at regular or irregular intervals. |
|
|
Constant element |
For which the basic time remains constant whenever it is performed |
|
|
Variable element |
For which the basic time varies in relation to some characteristics of the product, equipment or process |
|
|
Manual element |
Element which is performed by a worker. |
|
|
Machine element |
Element which is automatically performed by a power driven machine and once started it cannot be controlled by a worker except to terminate it. |
|
|
Foreign element |
An element, observed during study, which after analysis is not found to be an essential part of the job. (Any element which is not part of usual work cycle) |
|
While taking the time values, one should adhere to the below points:
1. First and foremost thing should be confidence building between Time Study personnel and the operator to be timed. The objectives should be clearly communicated. Many a time operators take Time Study as a threat to them and don’t take it positively. It should be treated as a routine activity with a sole objective of work betterment. In any case, Time Study without knowledge of operator should be prohibited and considered as an unethical practice. This may lead to mistrust between the observer and the operator.
2. Many a times, operators purposely slow down while Time Study is ON as they feel that working faster while Time Study may lead to tough production targets. Sometimes an opposite scenario is also witnessed where operators (mostly new operators work fast. The reason may be putting efforts to impress IE about his/her skills. In both the cases IE should ask the operator to work at natural pace.
3. Selection of right worker is very important. The worker selected must possess the ability to perform that task in a standardized manner. Worker selection for Time Study should be done in consultation with production personnel. Also, it is always better to take a number of operators rather than one operator for same operation while doing Time Study. This will bring homogeneity and increased acceptance of the observations.
4. The operator who is going to be timed should be given sufficient time to settle down before Time Study and should be able to achieve steady pace. Operator should feel comfortable while he/she is being observed.
5. While Time Study, unusual activities such as bobbin refilling, arranging the fallen bundle, threading, writing down something, halting work and talking to peers or supervisor, etc. should be ignored. The cycle consisting of such unusual activities should be discarded and a fresh observation should be taken.
6. The extreme time values should be discarded while analysis, as it may be due to errors while recording. Considering such values may lead to unrealistic results.
It is important to understand the various classes of elements before Time Study. Lack of clarity on type of elements may lead to errors in the observations. Some of the major classes of elements are as mentioned in Table 3.
It is worth mentioning that these element categories are not mutually exclusive in nature. While Time Study observer witnesses disturbances or interruptions in the work cycle being observed. Such interruptions are caused by the foreign elements, which are not an essential part of the job and do not add value to the work. These foreign elements make the work cycle longer than other cycles. It is recommended that work cycles consisting of such foreign elements should be discarded and a fresh cycle should be observed. Alternatively such elements may buy time separately and later while compiling time consumed in such elements should be subtracted from the total time. However, to minimize the error, in such a situation following the first approach (taking a fresh observation) is recommended.
Getting the Standard Time – It is very important to get the Standard Time for each operation. The sum of individual operations results into the work content of the product.
Introduction to Work Study by ILO reads work content as the amount of work “contained in” given product or a process measured in “work-hours” or “machine hours”. It is nothing but the minimum time theoretically required to produce one unit of output.
Work content = Basic Time + Relaxation Allowance + Any allowance for additional work
There are a number of terminologies used in industry and may differ from factory to factory. However, the fundamental understanding is more or less same. Observed Time (OT) is the average value of time observations achieved from Time Study. Observed Time is recorded from direct observation of the operator. Basic Time (BT) also termed as Normal Time in many factories is the time value achieved after incorporating operator rating. This is said Normal Time, as the time values have been levelled or normalized to a standard rate of work by multiplying observed value by rating. Further allowances such as Personal, Fatigue and Delay (PF & D) are added to the Basic Time or Normal Time to get the Standard Allowed Minutes (SAM) or Standard Minute Values (SMV).
Basic Time (BT) = Observed Time (OT) X Rating of the Operator
Rating, as discussed in the previous article (refer ‘Operator Rating’, StitchWorld, September 2014) is the assessment of the worker’s rate of working relative to the observer’s concept of the rate corresponding to the standard pace. Therefore, the rating of the worker gives the comparison of the rate of working observed with respect to the standard level, which is the average rate of a qualified worker, when he uses correct methods and when he is motivated to apply himself to the work. Operator rating (in % on a scale of 100) when multiplied by the observed time, gives the “basic time” for the element.
For example, if an operator is judged to be working slower (rating 80) and the observed time is 1.5 minute then,
Basic Time = 1.5 × 80/100 = 1.20 minutes Standard Time (ST) = Basic Time (BT) + Allowances
Suitable allowances, to compensate for Personal needs, Fatigue and Delay are added to get the Standard Time for a particular operation. Such allowances are popularly known as PF & D. Such allowances vary with individual personal needs, type of machine, and kind of work (light, medium and heavy, etc.). Till date there are no established standards for such allowances. In normal working conditions it is recommended to add 5-7% Personal Allowance. Delay Allowances (also called as Machine Delay Allowance or Work Allowance vary with the type of machine, these allowances are generally kept around 5-8%, while Fatigue Allowance (also called as Relaxation Allowance) are generally kept as much as 5%. In total PF & D Allowances should be kept between 12-16%.
Assuming PF & D Allowance is 15%, the Standard Time for the above observed operation will be 1.38 min. (1.2 min. as basic time + 15% of 1.2 min. as allowances added).
For calculation of SAM, two different methods are in practice; in first method allowances are progressively added, and in second method allowances are added to normal time. If the normal time is 1.5 min., PF Allowances is 10% and Machine Delay Allowances is 9%, then in first method SAM = 1.5 (1.09) x (1.1) = 1.7985 min. The logic behind this calculation is given by Paul Collyer, an independent consultant, as “Contingency Allowances to be added to Basic Time and to then add PF & D primarily because whilst most delays are machine-related (bobbin, rethread etc.), the operator is still working and therefore needs PF allowance also”. This method allows adding Machine Delay Allowance to machine elements separately.
For same reading, following the second method, the SAM = 1.5 + (1.5 x 0.10) + (1.5 x 0.09) = 1.785 min. Although not so commonly used, noted consultant Chandrajith Wickramasinghe prescribed use of this method because he says “allowance has to be calculated on observed time”.
In reality, IE executives in factory do not face above dilemma as they apply a blanket allowance covering both (i.e. 19% in above example to basic time). SAM = 1.50 x 1.19 =1.785. According to Paul Collyer this is not correct in terms of international best practice but it works and makes life simpler for harassed IEs who are under pressure to set SAMs.
Another important rule of Time Study is calculation of frequency of that element in the whole cycle. In PBU system when operator is untying (opening) and tying (closing) the bundle, that element should be recorded, calculated and apportioned to the sewing cycle. Suppose there is a bundle of 15 pieces of shirt front and operator sews the front placket, the Time Study of the front placket sewing operation is done and SAM value is 1.27 minute.
However for every 15 front placket making, operator is also doing untying and tying of bundle once before passing on the bundle to next operator; therefore 1/15th of the bundle tying and untying time also to be added to the front placket making cycle.
Another blatant mistake in the name of Time Study practiced in certain factories is Cycle Study. Here element breakdown of the operation is not done. Total Cycle Time for one complete bundle is noted and then divided by the number of pieces in the bundle to arrive at time required per piece. Although there is no particular name for this study; it is commonly called Cycle Study and used for quickly assessing “what’s happening” and this should not be confused with Time Study.
Post a Comment